In-App Purchases Integration (Swift SDK)
The iOS Billing SDK is a simple solution to implement Aptoide Connect billing. It consists of a Billing client that allows you to get your products from Aptoide Connect and process the purchase of those items.
In Summary
The billing flow in your application with the SDK is as follows:
- Setup the AppCoins SDK Swift Package;
- Query your In-App Products;
- User wants to purchase a product;
- Application starts the purchase and the SDK handles it, returning the purchase status and validation data on completion;
- Application gives the product to the user.
Step-by-Step Guide
Setup
-
Add AppCoins SDK Swift Package
In XCode add the Swift Package from the repo https://github.com/Catappult/appcoins-sdk-ios.git. -
Add AppCoins SDK Keychain Access Entitlement
In order to enable the AppCoins SDK to save the user’s AppCoins Wallet information in the keychain, the application will need to concede the SDK Keychain Access entitlements. To do so, follow these steps:- Select your project in the project navigator (left sidebar);
- Select your target under "TARGETS";
- Go to the "Signing & Capabilities" tab;
- Click the "+" button to add a new capability;
- Search for "Keychain Sharing" and select it;
- Enable the "Keychain Sharing" capability by double-clicking it;
- This will automatically write your app’s identifier in the "Keychain Groups" text box, you should replace it with “com.aptoide.appcoins-wallet“;
- Xcode will automatically generate an entitlements file (e.g., YourAppName.entitlements) and add it to your project;
-
Add AppCoins SDK URL Type
To manage redirect deep links for specific payment method integrations, your application must include a URL Type in the info.plist file. To do this, follow these steps:- In the project navigator (left sidebar), select your project.
- Under "TARGETS", select your target.
- Navigate to the "Info" tab.
- Scroll down to the "URL Types" section.
- Click the "+" button to add a new URL Type.
- Set the URL Scheme to "$(PRODUCT_BUNDLE_IDENTIFIER).iap" and the role to "Editor".
Implementation
Now that you have the SDK and necessary permissions set-up you can start making use of its functionalities. To do so you must import the SDK module in any files you want to use it by calling the following: import AppCoinsSDK.
-
Handle the Redirect
The SDK requires integration in your application’s entry points to properly handle deep links. This ensures that payment redirects and other deep link functionalities work seamlessly.
Depending on your app’s setup, you should handle deep links either in SceneDelegate.swift (for iOS 13+) or AppDelegate.swift (for older versions and apps that still use it).-
SceneDelegate.swiftIf your app uses SceneDelegate.swift, implement the following methods:
func scene(_ scene: UIScene, openURLContexts URLContexts: Set<UIOpenURLContext>) {
	if AppcSDK.handle(redirectURL: URLContexts.first?.url) { return }

	// Your application initialization
  initialize()
}

func scene(_ scene: UIScene, willConnectTo session: UISceneSession, options connectionOptions: UIScene.ConnectionOptions) {
  // Create the SwiftUI view that provides the window contents.
  let contexts = connectionOptions.urlContexts

  // Your application initialization
  initialize()

  if AppcSDK.handle(redirectURL: contexts.first?.url) { return }
}
Why This Logic?
- Initialize First in
willConnectTo- When the app launches or restores, UI and dependencies must be set up first.
- Handling deep links before this can cause issues if SDKs or services aren’t ready.
- Prioritize Deep Links in
openURLContexts- When a deep link arrives while the app is running, handle it immediately and return if processed.
- This prevents unnecessary re-initialization and ensures the app responds quickly.
- Initialize First in
-
AppDelegate.swift
If your app doesn’t use SceneDelegate.swift, implement deep link handling in AppDelegate.swift.func application(_ application: UIApplication, didFinishLaunchingWithOptions launchOptions: [UIApplication.LaunchOptionsKey: Any]?) -> Bool { // Your application initialization initialize() if let url = launchOptions?[.url] as? URL { if AppcSDK.handle(redirectURL: url) { return true } } return true } func application(_ app: UIApplication, open url: URL, options: [UIApplication.OpenURLOptionsKey: Any] = [:]) -> Bool { if AppcSDK.handle(redirectURL: url) { return true } // Your application initialization initialize() return true }Why This Logic?
- Initialize First in
didFinishLaunchingWithOptions- Ensure UI and dependencies are ready before processing deep links.
- Handling deep links too early could cause issues if services aren’t initialized.
- Prioritize Deep Links in
open url- When a deep link is received while the app is running, handle it immediately.
- If
AppcSDK.handle(redirectURL:)processes the link, return early.
- Initialize First in
-
-
Check AppCoins SDK Availability
The AppCoins SDK by default will only be available on devices in the European Union with an iOS version equal to or higher than 17.4 and only if the application was not installed through the Apple App Store. Therefore, before attempting a purchase, you should check if the SDK is available by callingAppcSDK.isAvailable.if await AppcSDK.isAvailable() { // make purchase } -
Query In-App Products
You should start by getting the In-App Products you want to make available to the user. You can do this by callingProduct.products.This method can either return all of your Aptoide Connect In-App Products or a specific list.
-
Product.products()Returns all application Aptoide Connect In-App Products:
let products = try await Product.products() -
Product.products(for: [String])Returns a specific list of Aptoide Connect In-App Products:
let products = try await Product.products(for: ["gas"])You will only be able to query your In-App Products once your application is reviewed and approved on Aptoide Connect
-
-
Purchase In-App Product
To purchase an In-App Product you must call the functionpurchase()on a Product object. The SDK will handle all of the purchase logic for you and it will return you on completion the result of the purchase. This result can be either.success(let verificationResult),.pending,.userCancelledor .failed(let error).In case of success the application will verify the transaction’s signature locally. After this verification you should handle its result:
– If the purchase is verified you should consume the item and give it to the user:
– If it is not verified you need to make a decision based on your business logic, you either still consume the item and give it to the user, or otherwise the purchase will not be acknowledged and we will refund the user in 24 hours.In case of failure you can deal with different types of error in a switch statement. Every error returned by the SDK is of type
AppCoinsSDKErrorand it is described later in this document.You can also pass a Payload to the purchase method in order to associate some sort of information with a specific purchase. You can use this for example to associate a specific user with a Purchase:
gas.purchase(payload: "User123").
let result = await products?.first?.purchase() switch result { case .success(let verificationResult): switch verificationResult { case .verified(let purchase): // consume the item and give it to the user try await purchase.finish() case .unverified(let purchase, let verificationError): // deal with unverified transactions } case .pending: // transaction is not finished case .userCancelled: // user cancelled the transaction case .failed(let error): // deal with any possible errors } -
Handle Purchase Intents
In addition to standard In-App Purchases, the AppCoins SDK supports In-App Purchase Intents – purchases not directly triggered by a user action (e.g., tapping a “Buy” button within the app). Common use cases include:
- Purchasing an item directly from a catalog of In-App Products in the Aptoide Store.
- Buying an item through a web link.
Purchase Intents can be initiated through the following URL format:
{domain}.iap://wallet.appcoins.io/purchase?product={sku}&oemid={oemid}&discount_policy={discount_policy}domain– The Bundle ID of your application.oemid– The OEM ID associated with your developer account on Aptoide Connect.discount_policy– The discount policy to apply (e.g., D2C).
The SDK allows developers to manage these purchases and deliver consumables to users through the
Purchase.updatesmethod. This method returns aTaskobject that streams real-time purchase updates, enabling seamless transaction handling.The stream emits a
PurchaseIntentobject, which you can manage according to your application logic. ThePurchaseIntentclass provides two methods:confirm(payload: String?, orderID: String?): Confirms and processes the purchase. Equivalent to calling.purchase().reject(): Rejects the intent, making it invalid for future use.
If you prefer not to handle the intent immediately – for example, waiting for the user to log in so the purchase can be linked to their account – you can ignore the intent at first. Later, when your logic allows, you can call
Purchase.intent, which returns the current pending intent. You can then confirm or reject it as needed.Below is a skeleton implementation for handling In-App Purchase Intents.
import AppCoinsSDK

actor PurchaseManager {
    static let shared = PurchaseManager() // Singleton instance

    private init() {
        Task { await observePurchases() }
    }

    private func observePurchases() async {
        for await intent in Purchase.updates {
            if User.isSignedIn {
                let result = await intent.confirm()
                await handle(purchaseResult: result)
            }
        }
    }

    // HINT: You can use the same handle method for both regular and intent IAP
    private func handle(result: PurchaseResult) async {
        switch result {
          case .success(let verificationResult):
               switch verificationResult {
                     case .verified(let purchase):
                          // consume the item and give it to the user
                          try await purchase.finish()
                     case .unverified(let purchase, let verificationError):
                          // deal with unverified transactions
               }
          case .pending: // transaction is not finished
          case .userCancelled: // user cancelled the transaction
          case .failed(let error): // deal with any possible errors
        }
    }
}
-
Query Purchases
You can query the user’s purchases by using one of the following methods:-
Purchase.allThis method returns all purchases that the user has performed in your application.
let purchases = try await Purchase.all() -
Purchase.latest(sku: String)This method returns the latest user purchase for a specific In-App Product.
let purchase = try await Purchase.latest(sku: "gas") -
Purchase.unfinishedThis method returns all of the user’s unfinished purchases in the application. An unfinished purchase is any purchase that has neither been acknowledged (verified by the SDK) nor consumed. You can use this method for consuming any unfinished purchases.
let purchases = try await Purchase.unfinished()
-
Testing
To test the SDK integration during development, you'll need to set the installation source for development builds, simulating that the app is being distributed through Aptoide. This action will enable the SDK's isAvailable method.
Follow these steps:
-
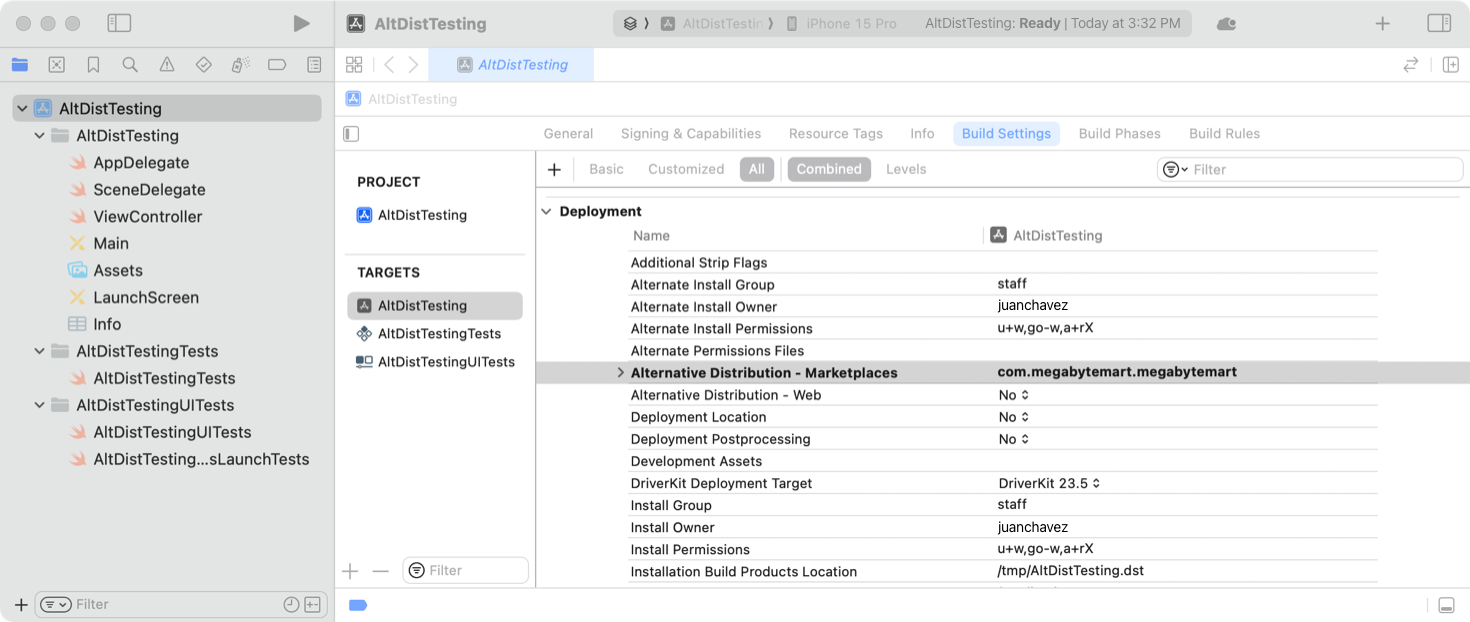
In your target build settings, search for "Marketplaces".
-
Under "Deployment", set the key "Marketplaces" or "Alternative Distribution - Marketplaces" to "com.aptoide.ios.store".
-
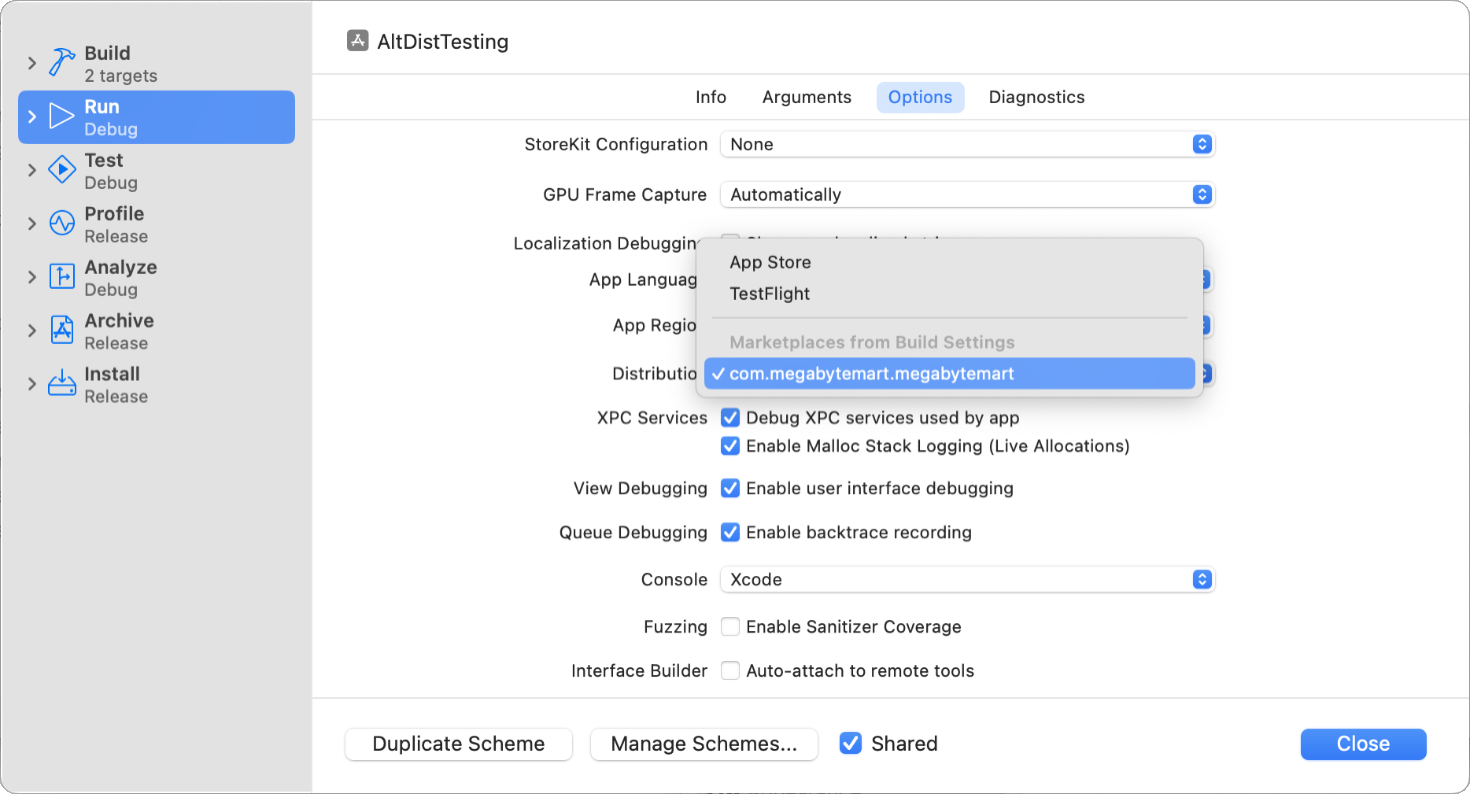
In your scheme, go to the "Run" tab, then navigate to the "Options" tab. In the "Distribution" dropdown, select "com.aptoide.ios.store".
For more information, please refer to Apple's official documentation: https://developer.apple.com/documentation/appdistribution/distributing-your-app-on-an-alternative-marketplace#Test-your-app-during-development
Testing Both Billing Systems in One Build
To facilitate testing both Apple Billing and Aptoide Billing within a single build – without the need to generate separate versions of your application – the AppCoins SDK includes a deep link mechanism that toggles the SDK’s isAvailable method between true and false. This allows you to seamlessly switch between testing the AppCoins SDK (when available) and Apple Billing (when unavailable).
To enable or disable the AppCoins SDK, open your device’s browser and enter the following URL:
{domain}.iap://wallet.appcoins.io/default?value={value}
Where:
domain– The Bundle ID of your application.valuetrue→ Enables the AppCoins SDK for testing.false→ Disables the AppCoins SDK, allowing Apple Billing to be tested instead.
Sandbox
To verify the successful setup of your billing integration, we offer a sandbox environment where you can simulate purchases and ensure that your clients can smoothly purchase your products. Documentation on how to use this environment can be found at: Sandbox
Extra Steps
Add Localization
In order to add translations for different localizations, the application will need to add a Mixed Localizations permission. Follow these steps:
- In the Project Navigator (left sidebar), locate the "Info.plist" file. It is typically in the root folder of your project.
- Double-click on "Info.plist" to open it in the property list editor.
- Add a new row - Right-click on any existing key-value pair in the property list editor and choose "Add Row," or use the "+" button at the top of the editor.
- Set the key to
CFBundleAllowMixedLocalizations. - Set the type of the new key to Boolean.
- Set the value to
YESto allow mixed localizations.
Classes Definition and Properties
The SDK integration is based on four main classes of objects that handle its logic:
Product
Product represents an in-app product. You can use it to either statically query products or use a specific instance to perform a purchase.
Properties:
sku: String - Unique product identifier. Example: gastitle: String - The product display title. Example: Best Gasdescription: String? - The product description. Example: Buy gas to fill the tank.priceCurrency: String - The user’s geolocalized currency. Example: EURpriceValue: String - The value of the product in the specified currency. Example: 0.93priceLabel: String - The label of the price displayed to the user. Example: €0.93priceSymbol: String - The symbol of the geolocalized currency. Example: €
Purchase
Purchase represents an in-app purchase. You can use it to statically query the user’s purchases or use a specific instance to consume the respective purchase.
Properties:
uid: String - Unique purchase identifier. Example: catappult.inapp.purchase.ABCDEFGHIJ1234sku: String - Unique identifier for the product that was purchased. Example: gasstate: String - The purchase state can be one of three: PENDING, ACKNOWLEDGED, and CONSUMED. Pending purchases are purchases that have neither been verified by the SDK nor have been consumed by the application. Acknowledged purchases are purchases that have been verified by the SDK but have not been consumed yet. Example: CONSUMEDorderUid: String - The orderUid associated with the purchase. Example: ZWYXGYZCPWHZDZUK4Hpayload: String - The developer Payload. Example: 707048467.998992created: String - The creation date for the purchase. Example: 2023-01-01T10:21:29.014456Zverification: PurchaseVerification - The verification data associated with the purchase.
PurchaseVerification
PurchaseVerification represents an in-app purchase verification data.
Properties:
type: String - The type of verification made. Example: GOOGLEsignature: String - The purchase signature. Example: C4x6cr0HJk0KkRqJXUrRAhdANespHEsyx6ajRjbG5G/v3uBzlthkUe8BO7NXH/1Yi/UhS5sk7huA+hB8EbaQK9bwaiV/Z3dISl5jgYqzSEz1c/PFPwVEHZTMrdU07i/q4FD33x0LZIxrv2XYbAcyNVRY3GLJpgzAB8NvKtumbWrbV6XG4gBmYl9w4oUgJLnedii02beKlvmR7suQcqIqlSKA9WEH2s7sCxB5+kYwjQ5oHttmOQENnJXlFRBQrhW89bl18rccF05ur71wNOU6KgMcwppUccvIfXUpDFKhXQs4Ut6c492/GX1+KzbhotDmxSLQb6aw6/l/kzaSxNyjHg==data: PurchaseVerificationData - The data associated with the verification of the purchase.
PurchaseVerificationData
PurchaseVerificationData represents the body of an in-app purchase verification data.
Properties:
orderId: String - The orderUid associated with the purchase. Example: 372EXWQFTVMKS6HIpackageName: String - Bundle ID of the product's application. Example: com.appcoins.trivialdrivesampleproductId: String - Unique identifier for the product that was purchased. Example: gaspurchaseTime: Integer - The time the product was purchased. Example: 1583058465823purchaseToken: String - The token provided to the user's device when the product was purchased. Example: catappult.inapp.purchase.SZYJ5ZRWUATW5YU2purchaseState: Integer - The purchase state of the order. Possible values are: 0 (Purchased) and 1 (Canceled)developerPayload: String - A developer-specified string that contains supplemental information about an order. Example: myOrderId:12345678
PurchaseIntent
PurchaseIntent represents a user’s intent to make an in-app purchase. It is typically used to confirm or reject a purchase initiated outside the application.
Properties:
id: String - A unique identifier for the purchase intent.timestamp: Date - The date and time when the intent was created.product: Product - The product the user intends to purchase.
AppcSDK
This class is responsible for general purpose methods such as handling redirects or checking if the SDK is available.
AppCoinsSDKError
The error enum that can be returned by the SDK while performing any action.
Possible errors:
networkError: Network related errors;systemError: Internal APPC system errors;notEntitled: The host app does not have proper entitlements configured;productUnavailable: The product is not available;purchaseNotAllowed: The user was not allowed to perform the purchase;unknown: Other errors.
Updated 26 days ago